3.3. Actions
Action is an activity that the Smart Communications module should perform with respect to the Customer Profile that was included in the campaign (e.g. send an email, wait, apply a filter, tag, etc.).
As the action input, the campaign receives an array of customer profiles. As the action output, the campaign receives an array of customer profiles for which the action was performed.
Creating an action
To create a new action in a chain, perform the following steps:
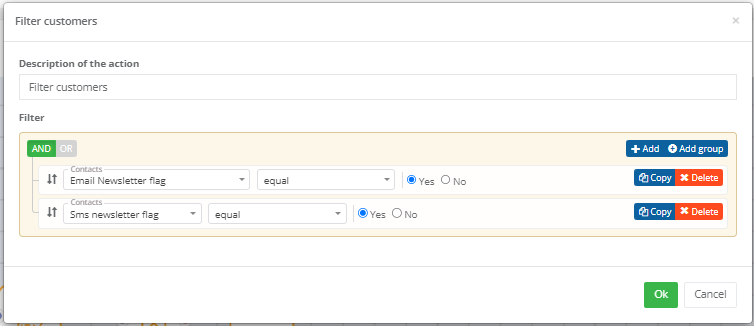
- drag an action from the left-side menu to the edit field;
- or click on the action, and then click on the edit field:
|
Connect the action with the previous element of the campaign using the left mouse button. The connection line should go from the red point to the blue one, as shown on the image. To remove the link, right-click on the line. |  |
The action in the campaign can be edited, copied, or deleted. Right-click on the action and select the desired option in the context menu that opens. To proceed to action editing, double-click on it with the left mouse button. |  |
| If a campaign has several scenarios for a trigger chain that end with the same action, there is an option to combine several campaign branches into a single action. |  |
The following actions are available in the Smart Communications module:
- Actualize filter
- Use customers from segment
- А/В test
- Add to audience
- Assign call
- Assess scores
- Issue bonus
- Limit the number of clients
- Limit poll
- Send SMS
- Send PUSH
- Send e-mail
- Filter customers
- Wait
- Wait till specific date
- Сheck mail status
- Report to Manager
| Action | Description | |||
Actualize filter | This action is used when the filter (Filter customers) has previously been set in the action chain, and now there is a need to update it. This is done to avoid duplicating the filter description. Example of filter application:
There may be other actions between the Filter customers and the Actualize filter actions. Similar to the Filter customers action, the Actualize filter action allows to split the incoming flow into two scenarios:
For example, the filter selects everyone to whom an SMS message will be sent. All others (the black point branch) will receive an email. Then both branches of the chain can be combined again with one common action (if required).
| |||
Use customers from segment | The action allows to select customers who are included in a certain preset segment. | |||
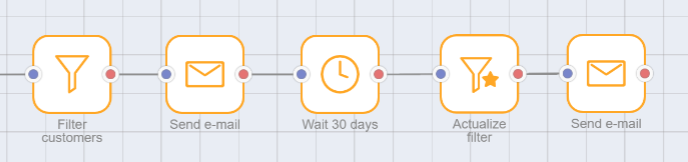
А/В test | This action allows to run the А/В testing, i.e. to create different variants for continuing the chain in the campaign. This helps to choose the best variant and further apply only this variant.
In the field — Distribute the number of customers randomly — randomly specify the number of customers that will be used for A/B testing. These customers will be evenly distributed across all branches. Then the most effective variant will be given preference. For example, if 500 is specified in the field, the first 500 customers will be evenly distributed across all branches, and all subsequent customers will be directed to the winning branch. In the field — Criteria for selection of the winning options — specify the criterion for selecting the best option. The winning option will be the one with the maximum number of openings/clicks/orders.
The field — Result waiting period, days — allows to make a pause and not immediately take into account the actions of customers. For example, if the field is set to 7 days, openings/clicks/orders will not be taken into account for the first 7 days for calculation of the winning option. To create branches, add the child actions. It is possible to add 2 or more different variants. А/В test example:
| |||
Add to audience | This action allows to include customers in audience or exclude from audience as part of campaigns.
Select the audience name from the drop-down list or create a new audience in the field below and it will be displayed in the list. If you need to transfer the list of customers from the audience to the Loyalty Program, check the corresponding box. If integration with the Loyalty Program is configured and it supports transfer of customer lists, the list will be automatically transferred to the Loyalty Program when it is added to the audience. For example:
The option Exclude from audience allows to exclude a customer segment from the audience. Select an audience that should be excluded from the drop-down list. Lists for excluding from audience can also be transferred to the Loyalty Program. | |||
Assign call | Allows to schedule a call to customers for a Call Center operator.
Specify a topic of the call (task theme). Prepare a call script for the Call Center operator. The Task script field allows to use the Template Engine patterns. The Assign to employee field allows to assign a call to a specific operator of the Call Center or make the employee selection automatic. There are 2 possible scenarios:
| |||
Assess scores | This action allows to accrue points/scores to customers for their actions in the System. For example:
Points can be both accrued and deducted. For example, if the customer has not purchased anything for three months — deduct 50 points. Using this action, you can pick the most active customers and build segments using scoring. Example:
In the Amount of scores field, you can specify both a positive number (to accrue points) and a negative number (to deduct points). For example, it is possible to accrue -10 points:
| |||
Issue bonus | This action allows to accrue bonus points to customers in the Loyalty Program.
Specify the quantity of bonus points to be accrued, validity period (if the Loyalty Program supports expiration of bonus points), and a legal entity. If required, add the description for bonus points accrual. If there is a need to accrue bonus points and send notification to customers, create a chain of actions in the campaign: Issue bonus > Wait > Send e-mail. In this case customers will get bonus points first, and then they will receive a message about accrual of bonus points. This will allow to avoid situations when the customer has already received a notification, but his/her bonus account has not been updated yet. | |||
Limit the number of clients | The action allows to limit the number of customers for whom subsequent actions in the chain will be performed. This limit is applied to the entire campaign. Once the specified number of customers is reached, the campaign stops. | |||
Limit poll | The action allows to set the maximum number of customers who will be able to participate in a poll previously created in the Polls section.
In the Poll field, select a poll for which you want to limit the number of participants. Then select one of the options for setting a limit:
If there is a need to specify how many customers to ask at a time, check the respective box and specify the number of customers. | |||
Send SMS | The action allows to send a text message to customers. Example of window for sending SMS without Viber option:
Example of window with active Viber option:
You can used macros in the text of the message. There is also an option to specify the mailing category so that to send the message only to interested customers. Delivery management By default, SMS messages are delivered to recipients only within the time interval allowed in the module settings, for example from 9:00 a.m. to 9:00 p.m. If the recipient's location time is outside the allowable interval, the message will wait in the queue for the next day until the allowable delivery interval. The Deliver immediately checkbox allows to ignore this rule and send the message immediately at the moment when a campaign is triggered, ignoring the time at the location of the message recipient. This functionality is relevant if the customers are located in several different time zones. | |||
Send PUSH | The action allows to send a push message to customers.
Fill in the required fields:
| |||
Send e-mail | The action allows to send an email to customers.
| |||
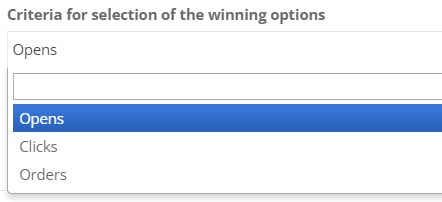
Filter customers | This action allows to determine for which customers the next action will be performed. For example, you can perform the following action only with those customers who have active SMS and email subscriptions.
The filter allows to split the incoming flow into two scenarios:
For example, the filter selects everyone to whom an SMS message will be sent. All others (the black point branch) will receive an email. Then both branches of the chain can be combined again with one common action (if required). More information about setting up filtering can be found in the section Creating a new segment. | |||
Wait | This action allows to delay the next action. Specify by how many hours/days/minutes you want to delay the next action. | |||
Wait till specific date | This action allows to delay the next action till a specified date. The next action in a campaign will be performed on the specified date at 00:00 (according to the time zone set in the section Settings > General settings > Contact details > Time zone). | |||
Сheck mail status | This action is applied after the Send e-mail action. It allows to implement different chains for customers depending on their reaction to the e-mail.
Possible e-mail statuses:
Action settings:
Example: Send an e-mail, wait for 5 days. Then check the e-mail status:
To set up such branching, add 3 child actions to the Check mail status action:
Then edit the Check mail status and specify a criterion for each option:
This is how the campaign chain will look like:
| |||
Report to Manager | This action allows to send an email to the company's employee who is using the Smart Communications module.
Specify the subject and add the text of the mail message. It is possible to use Template Engine patterns in the mail message field. You can send an e-mail to a specific employee by selecting his name in the drop-down list or make the selection of an employee automatic. |